While the Service History Report shows everything that was done on a site, the Billing Report focuses just on the services that need to be billed to your clients.
Table of contents:
- Billing Report Page
- Breakdown of a Billing Record
- How Service History Relates to Billing
- How to Update information in a Billing Record
- Service History → Billing Report Workflow
- Understanding How Invoice Numbers Work
- Understanding How Records Get Marked as Paid
- Customize Column Display
- Billing Records and QuickBooks
- Billing Records and Xero
- Export your Billing Records
- Using Search Filters
- Archiving Billing Records
- Unarchiving Billing Records
Billing Report Page
To access the Billing report page, select Billing at the end of the navigation bar.

Breakdown of a Billing Record
Each record on the billing page represents one service that has been performed on a clients site. Select a record to open it up.

A pop-up will appear with a list of the following information about the site that was serviced.
- Client, Contractor who serviced the site and Job ID.

- Timeframes

- Approved status and route information.

- Site information and client contract information.

- Before and after photo, weather conditions and operator information.

- The service, it's charge type and rates, work order consumable and equipment if used and total amount.

- Has the record been manually change, Invoice and check number, last update and payment date.

How Service History Relates to Billing
The information pulled into a billing record comes from the Service History records.
Each Service History record represents a single site visit, which may include multiple services.
Each Billing record, however, represents only one service performed during that visit.
So, if two services are completed during a single site visit, you'll see one Service History record but two Billing records.
Below are screenshots showing a single site visit where two services were performed—demonstrating one Service History record and two Billing records.
- Service History Record


- Billing records


How to Update Information in a Billing Record
You cannot update a billing record directly from the Billing Report page. The data for billing records is sourced from Service History records, so you’ll need to navigate to the Service History page, locate the corresponding record linked to your billing entry, and edit your Service History record there. Once you save the changes, the updated information will flow through to the billing record.
Service History → Billing Report Workflow

Understanding How Invoice Numbers Work
Invoice numbers are unique identifiers used to organize and track your billing records. You can assign the same invoice number to multiple billing records to group them together under a single invoice.
A payment can only be registered if the billing record has an invoice number.
Once a record is marked as paid, it can only be edited in the Service History Report by the Site Owner.
To set an invoice number, select one or more billing records and click the Dollar icon.

A pop-up will appear where you can enter your invoice number. Select save once you are done.

The invoice number will now appear at the bottom of the billing record.

Understanding How Records Get Marked as Paid.
When a billing record is created, it appears in your client's Yeti environment and is listed on the client's Sub-contractor Report page.

Your client can click the Dollar icon, which opens a pop-up showing a list of invoices. To view which billing records are included in a specific invoice, they can click the See Record button.

The client can check what records are in an invoice by selecting the see record button.

To mark an invoice as paid, your client must select the invoice from the list and select the Set Check number button.
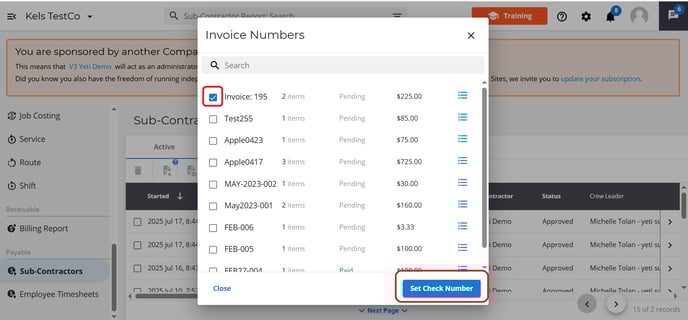
Enter the check number and click Update Check Number.

Once this is done, the invoice will be marked as Paid, and the associated billing records will be updated as paid on your side as well.


Billing Records and QuickBooks
You can push your billing records into your QuickBooks Online account, but there are a few rules and requirements to keep in mind such as all records should have the same client.
If you want to combine multiple records into a single QuickBooks invoice, you can either select records individually or use the search filter to select multiple records that meet the same criteria.
Once you have your records selected, select the QuickBooks Button.

A pop-up will appear asking you for confirmation that you want these record pushed to QuickBooks.

You will receive a message confirming that the records where pushed over successfully.

Billing Records and Xero
To export your records from Yeti to Xero, select the records and click on the button “XERO”. This will export an .cvs file which you can upload to your Xero account.

Customize Column Display
You can choose which columns are visible and set the order in which they appear. This configuration also determines how your service history data is exported when you use the Export to Spreadsheet button.
Click the Column Configuration button.

This will open a pop-up where you can assign numbers to fields to set their order. For example, entering 1 for Started At and 2 for Completed At will place Started At first, followed by Completed At.

To hide a column, click the eye icon next to it. Hidden columns will not appear on your view page or in exported spreadsheets.

Once you click save you will see your changes on billing report page.

When you select the export as spreadsheet option your column setting will control how your data is presented in the spreadsheet.

Export your Billing Records
You have two options when exporting records:
- Download Selected Records – This includes records that you've selected manually using the checkboxes or selected using the search filter. They will be exported to a spreadsheet


- Manage results - Selected Records. Use this option to export records that fall within a specific time range from the records you’ve already selected using checkboxes or filters. When you select the button a pop-up will appear where you can enter in your times. The records will be exported to a spreadsheet


Important Note: If the timeframe of your selected records does not fall within the date and time range you set in Manage Results, your exported spreadsheet will be empty. Make sure the selected records match the timeframe you've defined.
Using Search Filters
You can use the search filter to find specific records or group records by certain criteria.
To filter your data:
-
Type directly into the search bar, or

-
Click the search filter icon at the end of the search bar.
 A pop-up will appear with a list of fields you can filter by (such as site, route, or user).
 Note: All records shown after applying a filter can be exported at once.
Archiving Billing Records
Select a billing record and then select the bin icon. This will place the records into the inactive tab.

Unarchiving Billing Records
Head over to the inactive tab, select a billing record and then select the bin icon. This will place the records into the active tab.
