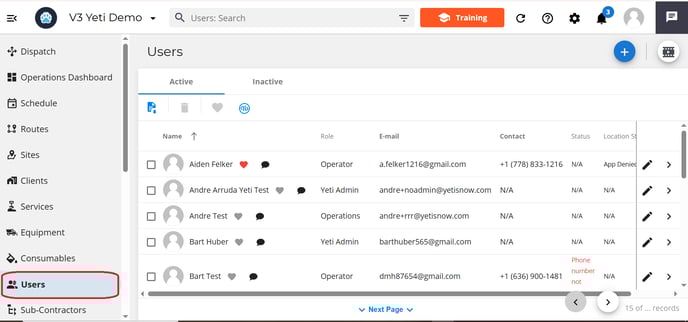
- User Page
- Create a User
-
Register the user's personal information
- Upload File to user profile
- Add a tag for your user
-
Register your user’s address and any additional phone numbers
- Update all the information if the account hasn't been verified
- Update some information if the account has been verified
- How do I protect my information from being edited by others
- Archive a User
- Favourite a User
- Message a User from the User Page
Create a User
Select the Blue (+) button to create a new user.

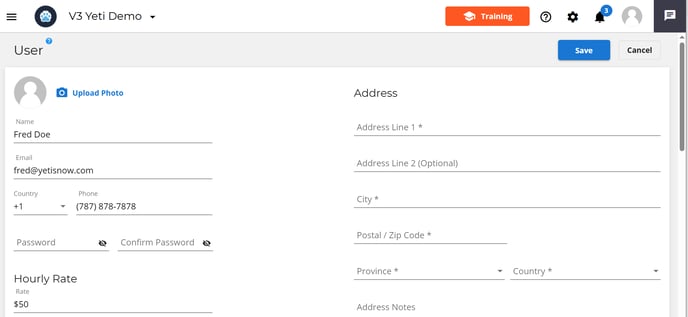
Register the user's personal information
Enter a first and last name, email address, phone number, and password for your user account.

Register the hourly rate to pay your Operator
Enter their hourly rate in the field below personal details. This rate will be use in reports such as Employee Timesheet Report and Job Costing.

Yeti has seven types of user roles. In the web app, most users have their own views, but in the mobile app, everyone sees the same thing.
- Administrators have full access to the system and can change a user's role. They are also the only users that can access the company setting in order to make any changes to General, Company and/or Subscription settings.
- Finance is responsible for reviewing the Billing Reports for the company's clients and paying the Sub-Contractors. This person has access to all company pages except the Settings page.
- Operations manage routes, sites, services, equipment, and approve dispatch records. Operations access cannot view accountability reports, such as the Billing Report, Subcontractor Report, and Employee Timesheet Report.
- Field Supervisor can access the dispatch page. This includes creating dispatches and approving records. They can create users with the role operator and crew member. They are blocked from reports, Contracts (Client and Sub-contractor), Sites, Services, Equipment and Consumables.
- Operator works on the Site using the mobile app and records the weather, temperature, snow depth, and photos of previous and present services, as well as the equipment and services provided. Since the operator uses the mobile app, access to the web app is limited.
- Crew Member is the person who performs the work on the Site as assigned by the Crew LEADER, but does NOT use the mobile app and therefore, does not have access to log in Yeti web or app. The purpose of this role is to track work completed and work hours only. In this role, a crew member would be temporarily added to help during a big storm event, for instance.
- Clients (Only an option on the client enviroment) are your users' clients with limited access. Only Sites and Service History Reports are available to them.

Clients need to be sponsored by you in order to be able to set the user as a Client. You can register a user with the role 'Client' by switching environments and accessing your Client's Yeti page.

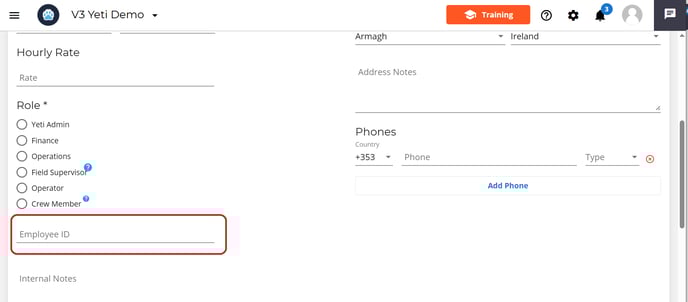
The purpose of registering your employee ID is to facilitate the search for your employee in the user pages or the Employee Timesheet report.
To manage your employee, add notes such as their availability, disability, etc.
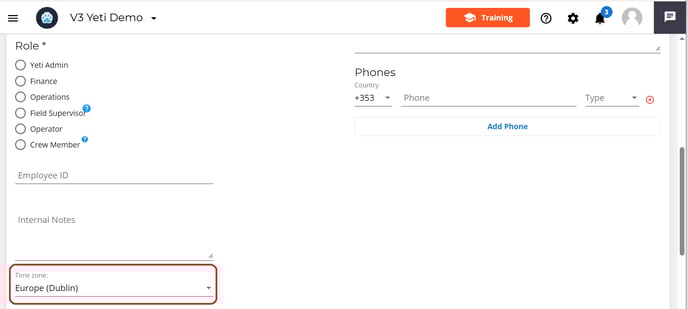
Time zones can be set individually for each user to ensure that all timestamps—such as dispatches, logs, and notifications are displayed in their local time. This setting applies to both the web and mobile apps.
Upload File to user profile
You can uploaded files such as contract, driver licence or certifications.

Tag your users to help organize teams and improve searchability. For example, users can be tagged by region (North Zone), role (Driver, Supervisor), shift (Night Shift), or certification (CDL Certified). This makes it easy to filter users based on team, assignment, or qualifications. Simply enter the tag name and click + Add Tag to apply

Sync your user with your employee QuickBooks
You can sync your Yeti user with your QuickBooks employee when you create or edit your user. Click here for more information.

Register your user’s address and any additional phone numbers
Registration of the address and additional phone number is optional.


When you edit your user, you are able to:
- Update all the information if the account hasn't been verified
- Update some information if the account has been verified
Update all the information if the account hasn't been verified
You can edit all the information if the user has not verified their email or phone number.
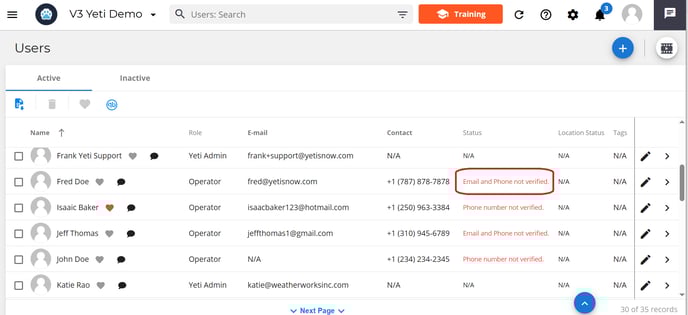
In the example below, the user has not verified their email or phone, so all fields are editable.
Update user information if the account has been verified
When the email or phone is verified, you can edit the user's information in two situations.
- If the email or phone number has been verified, the user's name and password can be edited, but not the email, phone number, or time zone. Other information, such as hourly rate, role, tags, address, and additional phone number, can always be edited.

- A user whose email or phone number has been verified but who has blocked others from updating their information cannot be edited. Other information, such as hourly rate, role, tags, address, and additional phone number, can always be edited.

How do I protect my information from being edited by others


A warning message appears when editing a user whose information cannot be changed by anyone else.

You can now export a list of your user's data from the user page. The spreadsheet that will be downloaded will have information regarding your users' names, role, email, contact status, location status, tags.

To archive a user in Yeti, go to the user's profile and select the check box beside their name. A bin icon will then appear. Click it and it will placed the users into the inactive tab.

Archiving removes the user from active lists while keeping their data—such as work history, file and personal details intact while blocking them from accessing your Yeti. This is helpful when someone leaves the team and no longer requires access, allowing you to maintain a clean user list without permanently deleting important records.

Favourite a User
Select the heart icon beside the users name to favourite them. This will app them to the favourite group chat on the messaging feature.


Message a User from the User Page
Select the Message icon beside the users name to open up the messaging feature

