Table of Contents:
- How to integrate your Yeti with your Quickbooks online account
- Syncing your yeti information with QuickBooks Online
- Sync All your Yeti Client with your Quickbooks Customer
- Sync a Single Yeti Customer to QuickBooks
- Verifying Client Sync in QuickBooks
- Sync All your Yeti Sub-Contractor with Quickbooks
- Sync a Sinlge Yeti Sub-Contractor to QuickBooks
- Verifying Sub-Contractors Sync in QuickBooks
- Sync All your Yeti Services and Quickbooks
- Sync a Sinlge Yeti Service to QuickBooks
- Verifying Service Sync in QuickBooks
- Sync your Yeti Consumables with QuickBooks
- Verifying Sub-Contractors Sync in QuickBooks
- Sync Yeti Equipment to QuickBooks
- Verifying Equipment Sync in QuickBooks
- Sync All Yeti User with your Quickbooks
-
- Pushing your Yeti Billing Report records to your QuickBooks Invoice
- Pushing your Yeti Employee Timesheet Report records to your QuickBooks Time Activities report
- Managing your Invoice Number
- Enabling Custom Transaction Numbers (ON)
- Disabling Custom transaction numbers (OFF)
- Understanding QuickBooks Online Currency
How to integrate your Yeti with your QuickBooks online account
- Click on the gears icon in the top navigation bar and then the Settings button.

2. Click on 'Connect to Quickbooks'.

3. Insert your Quickbooks login and password.
4. You will see the message confirming the integration.

Syncing your yeti information with QuickBooks Online
You can sync your data in Yeti with your Quickbooks Online. This includes Clients, Subcontractors, Services, Consumables, and Users. Once these items are all synced sucessfully you can then start pushing your records over to QuickBooks. This helps ensure your QuickBooks account stays aligned with the information you manage in Yeti.
Sync All Yeti Clients with your Quickbooks Customers
Go to your Client's page and click on the Quickbooks icon to see the relationship between your Client in Yeti and your Customer in Quickbooks.

You'll see a pop-up window displaying two columns, your Yeti items on the left, and the corresponding QuickBooks Items on the right. Each item is accompanied by a visual indicator to help you manage integrations:
-
Green Icon: This shows that the Yeti item is already successfully linked to a QuickBooks record.
-
Blue Icon: Yeti has automatically found a potential match in QuickBooks based on a similar name. You can review and confirm the association.
-
Red Icon: No match has been made yet. You'll need to manually select an option from the dropdown menu or create the corresponding QuickBooks item to complete the integration.
Click “Save” once you’ve finished making your selection.

Sync a Single Yeti Customer to QuickBooks
When you create a new client or are updating an existing one, you can sync it with your QuickBooks Online account.
Select the QuickBooks field and link it with the correct service or select 'Create this item in Quickbooks'. Learn more here.

Verifying Client Sync in QuickBooks
We recommend verifying the results directly in your QuickBooks account to ensure that all items have been successfully transferred and appear as expected.
Check your Clients on the Quickbooks Sales.


Sync your Yeti Sub-Contractor with your Quickbooks Suppliers
Your sub-contractors can be associated in the same way.
On the Sub-Contractor page, click on Quickbooks icon to view the association.

You'll see a pop-up window displaying two columns, your Yeti items on the left, and the corresponding QuickBooks Items on the right. Each item is accompanied by a visual indicator to help you manage integrations:
-
Green Icon: This shows that the Yeti item is already successfully linked to a QuickBooks record.
-
Blue Icon: Yeti has automatically found a potential match in QuickBooks based on a similar name. You can review and confirm the association.
-
Red Icon: No match has been made yet. You'll need to manually select an option from the dropdown menu or create the corresponding QuickBooks item to complete the integration.
Click “Save” once you’ve finished making your selection.

Sync a Sinlge Yeti Sub-Contractor to QuickBooks
When you create a new Sub-Contractor or are updating an existing one, you can sync it with your QuickBooks Online account.
Select the QuickBooks field and link it with the correct Sub-Contractor or select 'Create this item in Quickbooks'. Learn more here.
 Verifying Sub-Contractors Sync in QuickBooks
We recommend verifying the results directly in your QuickBooks account to ensure that all items have been successfully transferred and appear as expected.
Check your Sub-Contractor on the Quickbooks Expenses > Suppliers.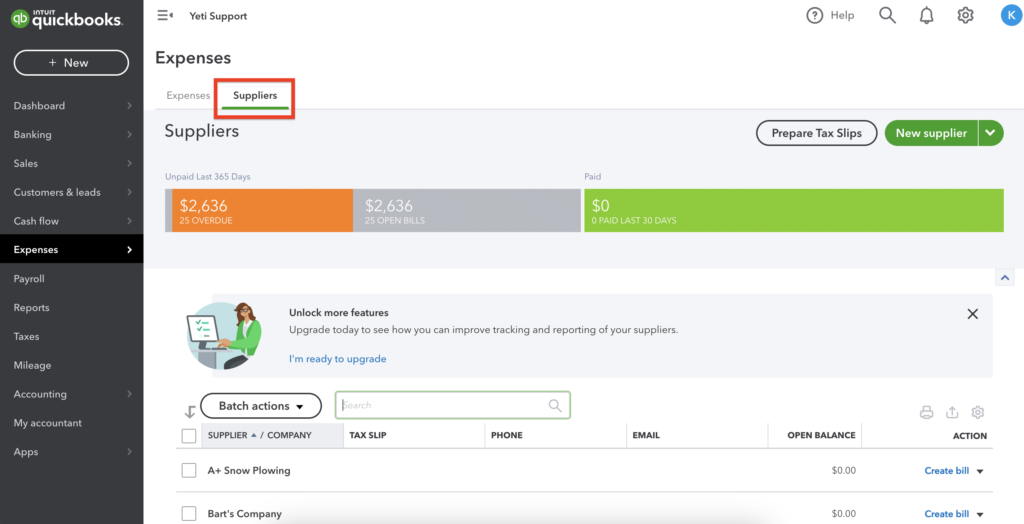
Sync All your Yeti Services and Quickbooks Services
Go to your Service page and click on the Quickbooks icon to see the relationship between your services in Yeti and your services in Quickbooks.

You'll see a pop-up window displaying two columns: your Yeti items on the left, and the corresponding QuickBooks Items on the right. Each item is accompanied by a visual indicator to help you manage integrations:
-
Green Icon: This shows that the Yeti item is already successfully linked to a QuickBooks record.
-
Blue Icon: Yeti has automatically found a potential match in QuickBooks based on a similar name. You can review and confirm the association.
-
Red Icon: No match has been made yet. You'll need to manually select or create the corresponding QuickBooks item to complete the integration.
Click “Save” once you’ve finished making your selection.

Sync a Sinlge Yeti Service to QuickBooks
When you create a new service or are updating an existing one, you can sync it with your QuickBooks Online account.
Head over tot the integration tab, select the QuickBooks field and link it with the correct service or select 'Create this item in Quickbooks'. Learn more here.

Verifying Service Sync in QuickBooks
Check your Service on Quickbooks by clicking on Sales > Products and Services.

You will see your Quickbooks Services on this page.

*** Important Information ***
If you create a Service on Quickbooks online, you must inform the "Income account". Next, you need to sync this Service with Yeti.


On the field "Income account", select the option "YetiSnow - Expense".

Sync your Yeti Consumables with QuickBooks
Sync your Consumables with Quickbooks or create a Consumable in your Quickbooks account that exists in Yeti.

Go to your Quickbooks online and click on Sales > Products and Services.

You will see your Quickbooks Consumables on this page.

*** Important Information ***
If you create a Consumables on Quickbooks online, you must inform the “Income account”. Next, you need to sync this Consumable with Yeti.


On the field “Income account”, select the option “YetiSnow – Expense”.

Sync Yeti Equipment to QuickBooks
When you create a new onboard equipment or are updating an existing one, you can sync it with your QuickBooks Online account.
Select the QuickBooks field and link it with the correct service or select 'Create this item in Quickbooks'. Learn more here.

Go to your Quickbooks online and click on Sales > Products and Services.
You will see your Quickbooks Consumables on this page.
*** Important Information ***
If you create a equipment on Quickbooks online, you must inform the “Income account”. Next, you need to sync this equipment with Yeti.
On the field “Income account”, select the option “YetiSnow – Expense”.
Sync All Yeti User with your Quickbooks
Go to your User's page and click on the Quickbooks icon to see the relationship between your user in Yeti and your Employee in Quickbooks.

You'll see a pop-up window displaying two columns, your Yeti items on the left, and the corresponding QuickBooks Items on the right. Each item is accompanied by a visual indicator to help you manage integrations:
-
Green Icon: This shows that the Yeti item is already successfully linked to a QuickBooks record.
-
Blue Icon: Yeti has automatically found a potential match in QuickBooks based on a similar name. You can review and confirm the association.
-
Red Icon: No match has been made yet. You'll need to manually select an option from the dropdown menu or create the corresponding QuickBooks item to complete the integration.
Click “Save” once you’ve finished making your selection.

Sync a Single Yeti User to QuickBooks
When you create a new user or are updating an existing one, you can sync it with your QuickBooks Online account.
Select the QuickBooks field and link it with the correct user or select 'Create this item in Quickbooks'. Learn more here
 Verifying User Sync in QuickBooks
Check your Users on the Quickbooks Payroll.

Reports
You can push 3 reports into Quickbooks from Yeti:
Note: If you need to make any changes after pushing your records, you will need to go to your Quickbooks account and manually make the changes there.
QuickBooks Invoice and Bill Settings
In Yeti, you can choose which information you want to push to QuickBooks Online. These settings help ensure that your invoicing and billing processes remain consistent between both platforms. Select the gear icon and select settings to set your invoice and bill settings.
QuickBooks Tax Setting
To set tax for your QuickBooks invoices and bills, select the Tax Setting button.

In the pop-up, you can configure your tax settings by selecting the Country, Province, and Tax Rate. To add multiple taxes, click the Add Tax button. If you need to remove a tax, select the red circle.

Select save once you are done.
Invoice Descriptions Settings
Select the options button underneath the invoice description heading to configure your QuickBooks Invoice settings.

In The pop-up you can chose what information is visible by turning the toggle blue.

The option are:
- Charge Type
- Site Address
- Site Name
- QuickBook Service description
- Started At
- Ended At
- Job ID
- Equipment
- Consumables
- Work Orders
When you have made your selection hit save.
Below is an example of a record that was pushed to Quickbooks Online.

This is how you can view your Invoice in Quickbooks online.

Selecting “Equipment” and “Consumables” will push your “Equipment amount” and “Consumables amount” respectively.


Customer vs. Supplier Naming Rules in QuickBooks Integration
In your Quickbooks online account, if you already have a supplier or customer registered with your company’s name, when you push your records from the Yeti Billing Report or Sub-Contractor report, Yeti will create a customer as “your company name – as customer” or a supplier as “your company name – as vendor.”
In the example below, “V3 Yeti Demo” is already listed in Quickbooks online as a supplier.

When pushing a record from Billing Report whose Client is “V3 Yeti Demo”, the system creates a customer “V3 Yeti Demo – As customer”.

Check here for more scenarios and rules when pushing records from the Yeti Billing Report into Quickbooks Online.
Bill Description Settings
Click the Options button located under the Bill Description heading to configure your QuickBooks bill settings.
From here, you can also choose which information from the Yeti Sub-Contractor Report should be included when pushing data to your QuickBooks Online Bill.

In The pop-up you can chose what information is visible by turning the toggle blue.

The option are:
- Charge Type
- Site Address
- Site Name
- QuickBook Service description
- Started At
- Ended At
- Job ID
- Equipment
- Consumables
- Work Orders
When you have made your selection hit save.
Below is an example of a record that was pushed to Quickbooks Online.

This is how you can view your bill in Quickbooks online.
For more details on how Yeti handles duplicate customer and supplier names, see here
Pushing your Yeti Billing Report records to your Quickbooks Invoice
Go to your Billing Report page, select the record, and click on the Quickbooks icon to push this record. For your records to be pushed, you must meet the following requirements:
- The record should be approved.
- The Client should be the same.
- To combine multiple billing records into a single invoice in QuickBooks, they must all share the same invoice number in Yeti
When creating invoices in QuickBooks Online from the Yeti Billing Report, there are a few important scenarios and rules to keep in mind to ensure a smooth sync. Learn more here.


The 'QuickBooks Id' number will appear after the record has been pushed to QuickBooks.
The 'Invoice Number' and the 'Job ID' will be pushed to QuickBooks. If you can not see the QuickBooks Id or Job Id Column, make sure that it is turned on in column configuration.

You can check the record in your Quickbooks account.


Check here for more scenarios and rules when pushing records from the Yeti Billing Report into QuickBooks Online.
Pushing your Yeti Sub-contractor Report records to your QuickBooks Bill
Go to your Sub-Contractor Report page, select the records, and click on the QuickBooks icon to push this record. For your records to be pushed, you must meet the following requirements:
- The record should be approved.
- The Client should be the same.
- To combine multiple billing records into a single invoice in QuickBooks, they must all share the same invoice number in Yeti


After you push the record to QuickBooks, you will see the 'QuickBooks Id' number.
The 'Job ID' will also show on your QuickBooks.

You can check the record in your QuickBooks account.


You can also choose which information from the Yeti Sub-Contractor Report should be pushed to your QuickBooks online Bill. As you can see here.
Pushing your Yeti Employee Timesheet Report records to your QuickBooks Time Activities report
Go to your Employee Timesheets Report page, select the records, and click on the QuickBooks icon to push this record.


How to Push Multiple Timesheet Records
You can push multiple timesheet records at once by doing either of the following:
-
Select individual records manually: Check the boxes beside each record you want to push together.

-
Use search filters: Apply filters based on specific criteria (such as date, operator, or site) to group related records. You do not need to select individual checkboxes—simply click the QuickBooks icon to push all filtered records to QuickBooks.

After you push the record to QuickBooks, you will see the 'QuickBooks Id' number.

You can check the record in your Quickbooks account.


When you register a new record on the Employee Timesheet report, you can also push it to QuickBooks.

Managing your Invoice Number
In Yeti, the invoice number is set in the Billing Report and the Sub-Contractor Report

In Quickbooks, you can set it up to generate invoice numbers automatically by clicking on gear > account and settings > sales.

You can turn 'On' or 'Off' to the option 'Custom transaction numbers' and it will auto-generate your invoice number. The following steps will show you what happens when you enable or disable this option.

Enabling Custom Transaction Numbers (ON)

With this option, if your record does not have an invoice number in Yeti, the invoice number field will be blank when you push your records from Yeti to Quickbooks.

By clicking 'Create invoice', Quickbooks will generate the next invoice number.


*** Important information ***
If you use the next number in QuickBooks’ invoice sequence when entering an invoice number in Yeti, QuickBooks will pick up right where you left off. For example, if the next number in QuickBooks is 500 and you enter 500 in Yeti, QuickBooks will accept it and then automatically generate 501 for the next invoice when you click Create Invoice.
Disabling Custom transaction numbers (OFF)

In this case, if you push your records from Yeti to QuickBooks, if there are no invoice numbers in Yeti, QuickBooks will automatically generate them.

However, you cannot see the invoice number field when you click on the invoice.

*** Important information ***
If you use a custom invoice number in Yeti that doesn’t follow QuickBooks’ numbering pattern—like test22—QuickBooks won’t recognize it as part of its sequence. So when you push that invoice to QuickBooks and later click Create Invoice, QuickBooks may reuse the same number, creating another invoice with test22 and causing duplicates.


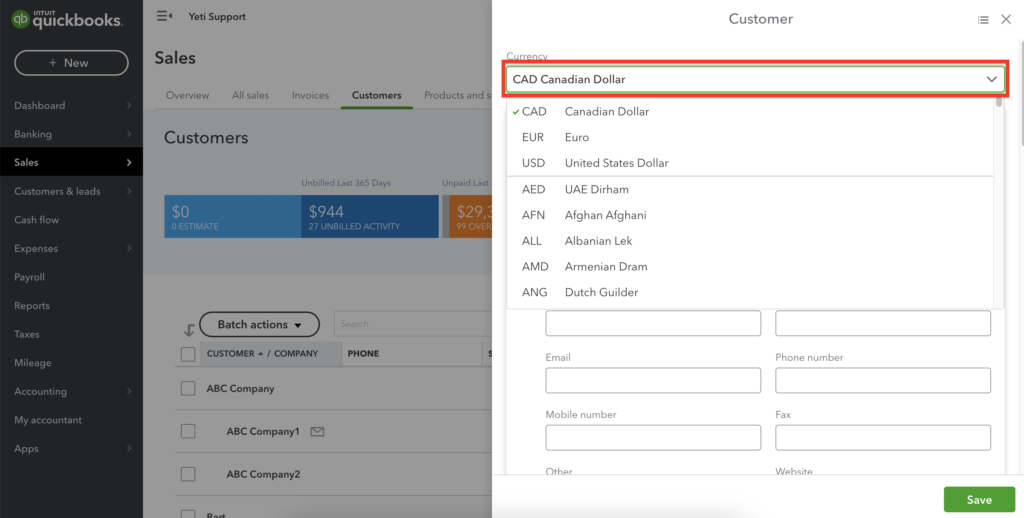
Understanding QuickBooks Online Currency
If you need to invoice clients in different currencies in QuickBooks Online, you'll need to enable the Multicurrency setting in your QuickBooks account. This is useful if your client base requires billing in more than one currency.
Keep in mind that once Multicurrency is turned on, it can’t be turned off—so be sure this is the right move for your business.
After enabling it, you'll be able to select a currency for each new customer you create. However, you won’t be able to change the currency for an existing customer once it’s been set.
- To set up your company, click on the gear

2. Click on 'Account and settings'

3. Click on 'Advanced' and set the 'Multicurrency' as 'On'

4. To set your new Customer on the correct currency, click on Sales > Customers

5. Click on 'New Customer'

6. Select the correct currency for your Customer