Table of Contents:
- Bulk sync Clients with QuickBooks
- Edit a Contract
- Bulk Update Client Contracts
- Massive Change and Equipment
- Massive Change and Consumable
- Export List of Client Contracts
- Archiving a Client Contract
- How Contract Information Appears in Reporting
Client Page
To get to the client page, select client in the navigation bar.

The client page is where you will find all of your client contracts.
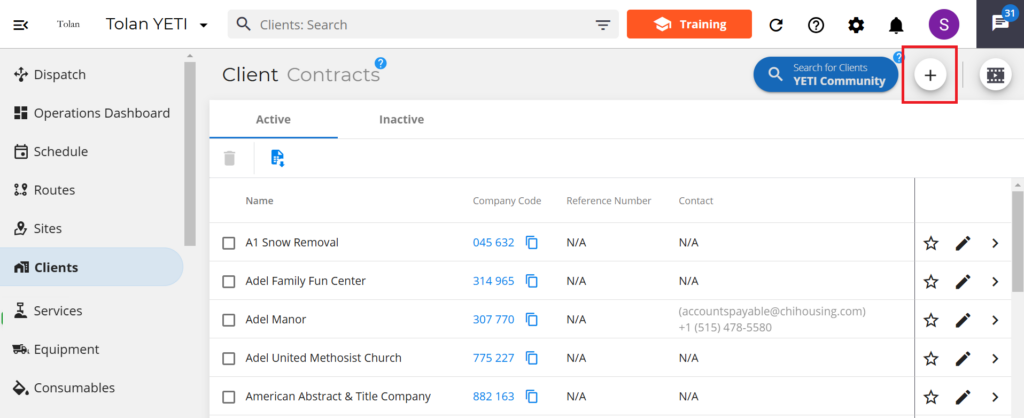
Create a New Client
To create a new client, select the white plus button. This will open up the contract builder.

Contract breakdown:
Contracts are broken down into a number of different sections. Some sections are mandatory to fill out, while others are optional.
Mandatory Fields
- Company Name: The name must be 3 characters or longer.
 All other fields found in the contract are optional. This includes rates, contact details and other information. For accurate reporting and records, we advise you to fill out the rate fields.
Optional Fields
- Contract Start and Finished Date
Set the dates when the contract begins and ends.
- Reference Number
Enter the unique identifier for the contract.
- Attachments
Upload any supporting files related to the contract (e.g., signed copies, documents, or notes)
- Adding Existing Sites
You can only add existing sites to a client contract. These sites must already be created on the Sites page in Yeti before they can be linked to a contract. Learn more here.
-
 A pop-up will appear with a list of already existing sites. Select which site you want to add to this client contract and select done.
Setting Rates in Contract
It’s important to remember that the rates that you have set in the contract are what will be used when charging the customer. If you do not set rates in your client contract, then the ‘default rates’ that you’ve set for any service, equipment categories and consumables will be used instead.

Operators will not be able to select consumables or equipment on the mobile app if they are not listed in the client’s contract first. Learn more about setting rates here.
Assigning Services to Sites
Once you have finished listing your sites, select the shovel button.

A pop-up will appear with a list of services. To add a service select the add service button. 
A new line will appear with empty fields. Select the service field to select a service.
A dropdown menu with a list of all your services will appear. Select the service you want to add.
Now select the charge type and add in a rate in the client section. 
If you use sub-contractor, you will also need to select the charge type and add in a rate in the sub-contractor section. 
If you want to make it mandatory that an operator list what consumables they used when completing this service, select the consumable required toggle
Select the Ok button once you are finished.

Equipment Rates
In the equipment section of your new client contract, you’ll see a list of equipment that has been automatically pulled in based on the default rates set on the Equipment Category page. Learn more about Equipment Category here.
Add Equipment to Contract
If you need to add other piece of equipment to the contract, you can do so by selecting the rate button in the equipment section.

A pop-up will appear showing a list of all equipment categories.
Enter a rate next to each piece of equipment you want to include in this client’s contract. The rates shown are based on the default rates, but you can update them to reflect the specific rates you want to charge this client.
If you don’t want to charge for certain equipment, simply enter $0.
When you're finished, click done.

Remove Equipment from Contract
If you want to remove a piece of equipment from the contract, select the red circle icon beside the equipment itself.

Any piece of equipment that is not listed in the Clients contract will be hidden from the mobile app when operators are servicing that client’s sites. To finalize any changes always SAVE the contract in the top right-hand corner.

Consumables Rates
In the consumables section of your new client contract, you’ll see a list of consumables that has been automatically pulled in based on the default rates set on the consumables page. Learn more about consumables here.
Add Consumables to Contract
If you need to add other consumables to the contract, you can do so by selecting the rate button in the equipment section. 
A pop-up will appear showing a list of all consumable categories.
Enter a rate next to each consumable you want to include in this client’s contract. The rates shown are based on the default rates, but you can update them to reflect the specific rates you want to charge this client.
If you don’t want to charge for certain consumable, simply enter $0.
When you're finished, click done.

Remove Consumable from Contract
If you want to remove a consumable from the contract, select the red circle icon beside the consumable itself.

Any consumable that is not listed in the Clients contract will be hidden from the mobile app when operators are servicing that client’s sites. To finalize any changes always SAVE the contract in the top right-hand corner.
Display to Operator Setting
If you include a piece of equipment or a consumable in a contract, it's important to ensure the “Display to Operator” toggle is turned on.
This setting can be found on the following pages:
- The equipment category page is where the display to operator toggle is for equipment. If it’s not enabled, the equipment will not appear for selection on the mobile app.

- The consumable page is where the display to operator toggle is for consumables . If it’s not enabled, the consumable will not appear for selection on the mobile app.

Address
Please note the Client’s billing address in the address field of the contract.

Contact Info
Please note the name and number of the person of contact for this Client’s contract. To add additional contacts, select the Add Contact button.

Clients and QuickBooks
The QuickBooks field gives you two options:
-
Sync with an existing client in QuickBooks
-
Create a new client in QuickBooks by selecting "Create this client in QuickBooks" from the dropdown menu

Once you save the contract, QuickBooks Online will be automatically updated with the selected client information.
Bulk Sync Clients with QuickBooks
To bulk sync your client with clients in QuickBooks head over to the client page and select the QuickBooks Button.

A pop-up will appear with a list of your Yeti clients on the left side. Beside each yeti client there is a link icon and a QuickBooks dropdown menu.

QuickBooks Link
The QuickBooks Link is available in 3 colours:
- Green: The green link means that the Yeti client has been successfully synced with the QuickBook client.

- Blue: The blue link means that a match has been found but has not been synced yet. To sync this match, select the save button.

- Red: The red link means that no match has been found and that you need to make the association by selecting the dropdown menu. When you find the correct match selct the save button.

Edit a Contract
If you need to make updates to a contract you can edit it. Select the pencil icon beside the contract.

This will open the Contract Builder, where you can make your changes. Once you’re finished, click save to apply your updates.

Bulk Update Client Contracts
You can bulk update client contracts with equipment and consumable information using the massive change feature. You can either:
- Update all contracts in one go by selecting the massive change button

- Update serval contracts by selecting the checkbox beside them and then selecting the massive update button.

You will be given the choice to either update equipment or consumables.

Massive Change and Equipment
To update equipment in contract, you can select the Add Equipment and Change Rate button.

Then, select the specific pieces of equipment and add the rate you want them to have. Select save when you are done.

If you want to remove equipment from contracts, then you can select the remove equipment button.

Select the piece of equipment you want removed from contracts and hit save.

Massive Change and Consumable
To update consumables in contracts, you can select the Add consumables and Change Rate button.

Then, select the specific consumables and add the rate you want them to have. Select save when you are done.

If you want to remove consumables from contracts, then you can select the remove consumables button.

Select the consumables you want removed from contracts and hit save.

Export List of Client Contracts
You can export a list of your client into a spreadsheet. Select the export button and a spreadsheet will be processed and be available to download


The spreadsheet will include:
- Client Name
- Company Code
- Refernce Number
- Contact

Archiving a Client Contract
If you are no longer working with a client you can archive their contract. Select the contract and then select the bin icon to place it in the inactive list.

A warning message will appear warning you that if you archive this contract, then all Sites belonging to this Contract will be archived, removed from Routes, and all sites service settings will also be lost. This action can not be undone.

This action will not affect any past records, such as:
- Service history report
- Billing report
- Sub-contractor report
- Job costing
How Contract Information Appears in Reporting
Details from client contracts are automatically included in Yeti reports. This ensures your reporting is accurate and aligned with the terms of each client’s agreement.
Information pulled from contracts includes:
-
Client name – to identify which client the report relates to.
-
Contract reference number – for quick lookup and tracking.
-
Client rates – to calculate costs, revenue, or usage based on agreed pricing.
If you want to see just the reports connected to a specfic client. You can use the search filter found at the top of the report page. Learn more here.