Table of Content:
- Equipment Page
- What is Onboard equipment?
- What is the Equipment Category?
- Equipment and QuickBooks
- The Equipment Cost Calculator
- Equipment Category Page
- Equipment Required
- Archiving Onboard Equipment
- View Equipment Data in records
- Equipment Column in Reports
- Exporting Equipment Information
Equipment Page
To get to the equipment page, select equipment in the navigation bar.

The equipment page is where you can find a list of your onboarding equipment and access your equipment categories.

What is Onboard equipment?
Onboard equipment refers to the tools and machinery crews takes with them at the start of their shift. In the mobile app after you select the start shift button, a list of onboard equipment appears, serving as a checklist.

The onboarding equipment list in the mobile app matches the equipment list shown on the equipment page, based on each item's visibility setting.

How to create onboard equipment?
Click on the blue (+) button to create your piece of Equipment

There are four fields to fill out when creating a piece of equipment:
- Name
- Name for operator
- Equipment category
- QuickBooks equipment
- Cost of equipment
Adding more than one piece of Equipment at a time is possible by selecting ‘Add Equipment’. Hit save once you are done entering information.
What does name for operator mean?
This field lets you customize how the equipment name appears in the mobile app, so it's easier for field staff to recognize.
What is the equipment category?
Equipment categories are the groups of tools and machinery that share a common function and are used to complete services. By organizing your equipment into categories, it’s easier to manage rates and track usage for billing.
Example: If you have multiple plow trucks, you can group them under the "Plow Truck" equipment category. That way, you don’t need to set a rate for each individual truck—just one rate for the whole category.
Equipment and QuickBooks
Choose to either sync your equipment with an existing item in QuickBooks or select "Create this item in QuickBooks" from the dropdown menu. This ensures your records stay accurate and supports smooth integration between Yeti and QuickBooks.

The Equipment Cost Calculator
The Equipment Cost Calculator helps you estimate the total cost of a piece of equipment by factoring in key operational and financial inputs. It allows for more informed budgeting, forecasting, and rate-setting based on real usage and cost data.

The calculator uses the fields below to calculate your totals.
Owned Pieces of Equipment
- Contract
- Forecast Billable Hours hrs/yr
- # hours in typical a work day
- Purchasing Costs
-
Purchase Price
-
Expected life of vehicle (years)
- Resale value at the end of life
-
- Operating Costs
- Annual Maintenance & Repairs
- Annual Insurance
- Annual Licensing
- Fuel Costs
- Average Fuel Price (per Gallon or Litre)
- Average Fuel Consumed per Day (Gal/L)
- Calculated Output
- Total Purchasing Costs
- Total Operating Costs for Term
- Fuel Cost per Hour
- Hourly Cost
- Daily Cost

Financed Pieces of Equipment
The only fields that are different are under Purchasing Costs:
- Purchasing Costs
- Purchase Price
- Down Payment
- Finance Rate (annual)
- Finance Term (months)
- Salvage/Residual Value

Once you click save the calculator will calculate the following information:
- Hours per day
- Daily Cost
- Hourly Cost
This financial information will be used in other features such as Job Costing and the Quote Tool.
Equipment Category Page
In order to set your Equipment Category, you'll need to head over to the Equipment Category page. You can find the Equipment Category page by selecting the equipment category button on the equipment page.

Equipment Category Rates
On the equipment category page, you can set Default Rates for Client and Subcontractor contracts

Default Rates for Equipment
When you fill in the default rates, those values will automatically apply to any new contracts you create. You can still change the rates for individual contracts if needed. If you don’t want to set default rates, the system will use $0 by default. Updating the default rates will not affect existing contracts—only new ones.
Important note: The equipment category rate that you have set in your contract is what will be used for billing your clients and sub-contractors, not the default rates.
Equipment Category Visibility on the Mobile App
For equipment to be selectable on the mobile app, two things need to be in place.
- The display to operator toggle needs to be turned blue. To turn it on, you need to enter a rate for both the client and sub-contractor. If you do not have any default rates, then you can enter the rate of $0.

- You also need to list the equipment in client contracts and sub-contractor contracts.
- By listing the equipment in the client contract, your mobile app users will be able to select it when they are servicing that client's site. Learn more here
- By listing equipment in the sub-contractor contract, your sub-contractor users will be able to select when servicing sites it on the mobile app. Learn more here

Equipment Required
You can require operators to select the equipment they used when choosing a service in the mobile app.
If a service shows “Equipment Required”, it means selecting a piece of equipment is mandatory. This is important because the equipment usage time is used for billing calculations. Learn how to do so here.

Archiving Onboard Equipment
When a piece of equipment is no longer in use, you can archive it. This will remove the onboard equipment from the active list and put it in the inactive list.
To archive an item, first select the equipment, then select the bin icon.

If you need to retrieve it again, head over to the inactive tab, select the equipment and then select the bin icon.

View Equipment Data
Equipment are tracked and used across multiple reports in the Yeti web app to support accurate monitoring, billing, and cost analysis. You’ll find equipment data integrated into five key pages: Dispatch Page, Service History Report, Billing Report, Sub-Contract Report, and Job Costing Report. Click on a record to open it up.
- Dispatch
The Dispatch page displays the onboard equipment selected by your crew through the Mobile App, allowing you to see which operator has which equipment in real time.
When crew members do not select any onboard equipment, it appears as ‘N/A’.
Select a site record on the dispatch page to see the following

- Service History Report

- Billing Report


Equipment Column in Reports
If you want equipment information to be visible on a report page, you must turn the correct fields on in the column configuration settings. Select the column configuration found at the top of the page.

Head down the list until you find the equipment field. Turn the eye icon blue to make it visible. Next to each field, there’s a number input field. This number determines the order the columns appear on the report page.
For example:
- A column with order "1" appears first.
- A column with order "2" appears second, and so on.
Equipment Column in Reports
Different reports have different equipment options.
- Service History Report:
- Equipment
- Equipment Duration
- Equipment Duration Decimal
- Billing Report:
- Onboard Equipment
- Equipment
- Equipment Duration
- Equipment Duration Decimal
- Equipment Amount
- Equipment Customer Rate
- Sub-contractor Report:
- Onboard Equipment
- Equipment
- Equipment Duration
- Equipment Duration Decimal
- Equipment Amount
- Job Costing Report:
- Onboard Equipment
- Equipment
- Equipment Duration Hours
- Equipment Charges
- Equipment Amount
- Sub-Contractor Equipment Charge
- Sub-Contractor Equipment Amount
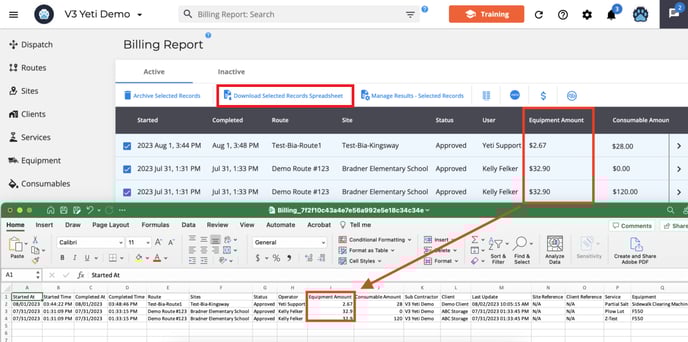
Exporting Equipment Information
When exporting records as a spreadsheet, make sure the correct equipment fields are turned on in the Column Configuration settings, and that the columns are arranged in the order you prefer.
The exported spreadsheet will match the visibility and order of the columns as they appear on the report page at the time of export.
If you have any questions, please contact Yeti Support (support@yetisoftware.com).