- Export Data from Yeti to Xero
- Importing Data into Yeti
- Configure Xero Settings in Yeti
- Xero Spreadsheet Headings
Export Data from Yeti to Xero
To export your data from Yeti, go to Billing Report, select records, and click on the button "XERO".

Verify that the Client exists in XERO before importing your data. Check this information by going to your XERO account > Contacts > Customers. To import properly for each customer, this name must match the name registered on Yeti.

Importing Data into Yeti
To import your Yeti data into your XERO account, go to XERO > Business > Invoices and click on "import".

Configure Xero Settings in Yeti
Yeti provides the ability for you to set your:
This should be done before importing the data into Xero
XERO Tax Code
You can set the tax that you want to appear in XERO invoice. Click on gear > settings.

Head down the the heading Xero and select the tax setting button.
In the pop-up, set the tax type, country and province. Select the add tax if you want to add any additional tax. Select save once you are done.
Don't forget to select save in the genral setting page.

To see XERO taxes, go to your XERO account > Accounting > Advanced > Tax rates.

You will see the list of taxes.
For example, copy the tax "GST/PST on Sales" and paste it into tax type field in Yeti, or click on the "New Tax Rate" button to register the same tax as you entered into Yeti.

The tax appears in the CSV file under the heading TaxType when you export data from your Billing Report.

XERO Account Code
XERO account code needs to be listed in services in Yeti. To update a service with the correct code, go to Services page and select the pencil icon beside the service you want to update.

Head over to the intergration tab and paste the code shown in XERO into the Xero field.
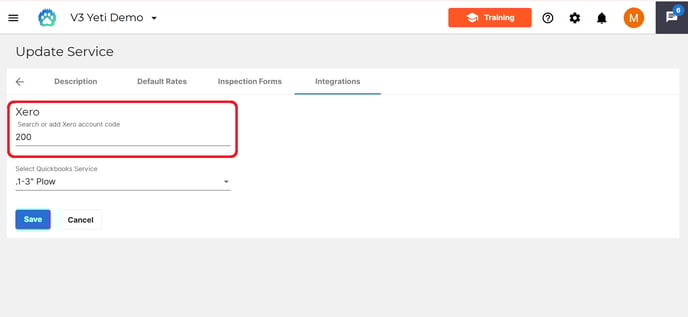
To see the account code in XERO, go to Accounting > Chart of accounts.

You will see the list of the account codes.
Here you can copy the code "200" and paste it into Yeti, or click on the "Add Account" button to register the same account code as you entered into Yeti.

The account code appears in the CSV file when you export data from your Billing Report.

Xero Spreadsheet Headings
Here are the fields that XERO expects to receive from Yeti.
| Contact name | string | If an invoice in the file is for an existing contact, ensure this exactly matches the contact name in Xero, to avoid creating a duplicate contact record. | |||
| EmailAddress | string | Company Email Address | |||
| POAddressLine1 | string | Company Address Complement | |||
| POAddressLine2 | string | Company Address Complement | |||
| POAddressLine3 | string | Company Address Complement | |||
| POAddressLine4 | string | Company Address Complement | |||
| POCity | string | Company City | |||
| PORegion | string | Company Region | |||
| POPostalCode | string | Company Postal Code | |||
| POProvince | string | Company Province | |||
| POCountry | string | Company Country | |||
| *InvoiceNumber | number | Each invoice in the file must have a unique invoice number. If an invoice number in the file already exists in Xero, that invoice won’t be imported. | |||
| Reference | string | – | |||
| *InvoiceDate | date | Invoice Date Use the format DD/MM/YYYY | |||
| *DueDate | date | Invoice Due Date Use the format DD/MM/YYYY. | |||
| Total | number | Invoice Total | |||
| InventoryItemCode | string | Enter the code of the inventory item. If the code doesn’t already exist, a new inventory item is created when you import the file. | |||
| *Description | string | Invoice Description | |||
| *Quantity | number | Invoice item Quantity | |||
| *UnitAmount | number | Invoice unit Amount | |||
| Discount | number | Enter a discount percentage of up to 2 decimal places, without the % sign. | |||
| *AccountCode | number | Account Code from Xero | |||
| *TaxType | string | Enter the tax rate display name as it displays in tax settings. If the name contains words and a percentage, enter it in full eg 20% (VAT on Income). | |||
| TaxRate | number | Tax Rate | |||
| TaxAmount | number | Xero automatically calculates the amount of tax for each invoice using the tax rate and amount. If you need to enter specific tax amounts, enter them in TaxAmount. After you import the file, the invoices will include a tax adjustment for the difference between the entered tax and calculated tax. If you use this option, enter prices as tax exclusive. | |||
| TrackingName1 | string | – | |||
| TrackingOption1 | string | – | |||
| TrackingName2 | string | – | |||
| TrackingOption2 | string | – | |||
| Currency | string | Enter the 3-letter abbreviation of the currency of the invoice, eg EUR. If the currency isn’t already in currency settings, you’ll need to add it first. | |||
| BrandingTheme | string | – | |||
| Exported Count | number | Number of times the export was performed | |||